AI links open with a title + excerpt (these tools can't fetch the page themselves) — use "Copy full article" to paste the complete text for a fuller summary.
Introduction In this article, we will learn MVC using xeditable json data using for html element & tables, which are given below.
- HTML Control
- Table
Angular-xeditable: This is angular directives allows you to create editable element. Such technique is Click to edit or edit to place. It is based on idea of x-editable. Features
- It doesn’t depend on any libraries
- It support bootstrap CSS
- We can include some extra control from Angular UI Bootstrap
- It will support must of html5 controls (text, textarea, select, and check box….etc.)
Follow the steps we can use xeditable in Angular JS in MVC.
- Create MVC project
- Configure angular xeditable
- Work with angular xeditable.
Create MVC Project Open Visual studio 2015 
Go to New menu. Click New & Project. Now, it will open New Project Window. 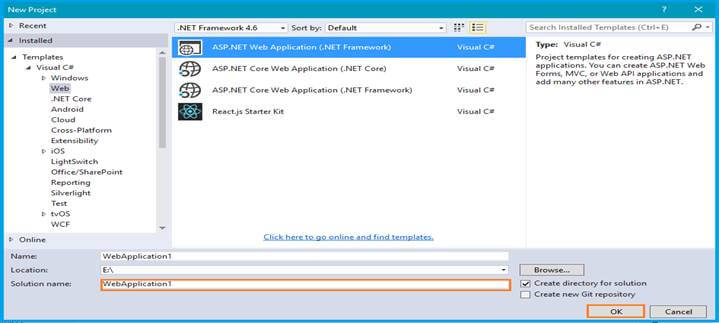 You can select ASP.NET Web Application on Framework 4.6. Enter the name of the project in Solution name textbox and click OK button.
 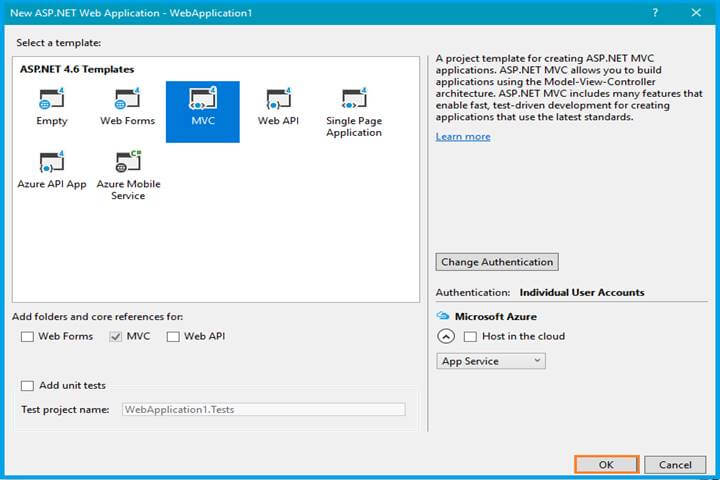 One more Window should appear. Select MVC Template in this popup & click OK button. Now, it starts to play. Configure Angular xeditable We will download the xeditable plug in from
Open the _Layout.cshtml and refer the xeditable.js file from the downloaded folder to this view page.
My files
Angular Module Code
Add dependence “'xeditable'” keyword in angular module after refer the plug in
var XEdit = angular.module('XEdit', ['ui.router','xeditable']);
Angular Controller Code: Inject the “editableOptions”, “editableThemes” keyword, it will help to improve our UI level function htmlctrlController($scope, editableOptions, editableThemes, $filter, $http)Set theme in this application, like given below code
editableOptions.theme = 'bs3'; editableThemes.bs3.inputClass = 'input-sm'; editableThemes.bs3.buttonsClass = 'btn-sm'; editableThemes.bs3.submitTpl = ''; editableThemes.bs3.cancelTpl = '';
Work with Angular xeditable
HTML control Open HTML page, make it design, using Editable attribute and bind the even null values also.
{{ xform.htmlctrl.email || 'empty' }}
Here, we can see some HTML basic control. HTML code
{{ xform.htmlctrl.tel || 'empty' }} {{ xform.htmlctrl.number || 'empty' }} {{ xform.htmlctrl.color || 'empty' }}
<a href="" editable-date="xform.htmlctrl.date">{{ xform.htmlctrl.date || 'empty' }}</a>
<a href="" editable-text="xform.htmlctrl.name">{{ xform.htmlctrl.name || 'empty' }}</a>
<a href="" editable-textarea="xform.htmlctrl.desc" e-rows="3" e-cols="30">{{ xform.htmlctrl.desc || 'no description' }} </a>
{{ xform.htmlctrl3.text || 'not set' }} {{ xform.htmlctrl.desc || 'no description' }}
Writing Angular control & assign some values for the model. Usually, we have use the ng-Model keyword for data binding but in this case, we want to use editable+ControlName.
Editable keyword
Angular/HTML keyword
Descriptions
Editable-controlname
Ng-Model
Binding the data
e-ng-options
Ng-options
Binding the value as list
e-pattern
Ng-pattern
Using Validation
e-title
Title
Set as placeholder
e-min
Min
Set minimum values
JS code
vm.htmlctrl = { email: 'email@example.com', tel: '123-45-67', number: 29, range: 10, url: 'http://example.com', search: 'blabla', date:new Date(), color: '#6a4415', desc: 'Click and edit the details. ' };
vm.htmlctrl2 = {
    status: 2
};

vm.statuses = \[
  { value: 1, text: 'status1' },
  { value: 2, text: 'status2' },
  { value: 3, text: 'status3' },
  { value: 4, text: 'status4' }
\];

vm.showStatus = function () {
    var selected = $filter('filter')(vm.statuses, { value: vm.htmlctrl2.status });
    return (vm.htmlctrl.status && selected.length) ? selected\[0\].text : 'Not set';
};

// select remote
// -----------------------------------

vm.htmlctrl3 = {
    id: 4,
    text: 'admin'
};

vm.groups = \[\];

vm.loadGroups = function () {
    return vm.groups.length ? null : $http.get('server/xeditable-groups.json').success(function (data) {
        vm.groups = data;
    });
};

$scope.$watch('htmlctrl3.id', function (newVal, oldVal) {
    if (newVal !== oldVal) {
        var selected = $filter('filter')(vm.groups, { id: vm.htmlctrl3.id });
        vm.htmlctrl3.text = selected.length ? selected\[0\].text : null;
    }
});
I have used as a JSON data for editable-Select & the files are given below.
[{ "id": 1, "text": "user" }, { "id": 2, "text": "customer" }, { "id": 3, "text": "vip" }, { "id": 4, "text": "admin" }]
Proceed, as shown below.
{{ xform.htmlctrl3.text || 'not set' }}
"
Run the Application. In the output 1, we have archived the binding data to HTML & proceed. Output 1 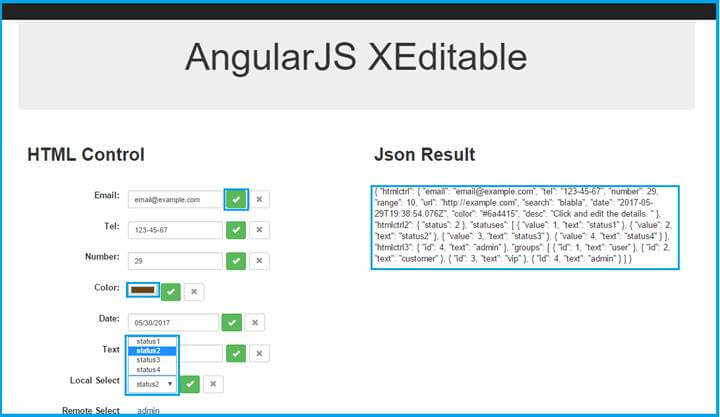 If you have any doubt for on configuration, refer to the links Table We can you use xeditable and proceed Editable Row This option is mostly useful for all of us, since end users find it easy to interact this way. HTML code
| Name | Status | Group | Edit |
| {{ user.name || 'empty' }} | {{ xtable.showStatus(user) }} | {{ xtable.showGroup(user) }} |
Angular Controller code
vm.users = [ { id: 1, name: ' user1', status: 2, group: 4, groupName: 'admin' }, { id: 2, name: ' user2', status: undefined, group: 3, groupName: 'vip' }, { id: 3, name: ' user3', status: 2, group: null } ];
vm.statuses = \[
  { value: 1, text: 'status1' },
  { value: 2, text: 'status2' },
  { value: 3, text: 'status3' },
  { value: 4, text: 'status4' }
\];

vm.groups = \[\];
vm.loadGroups = function () {
    return vm.groups.length ? null : $http.get('server/xeditable-groups.json').success(function (data) {
        vm.groups = data;
    });
};

vm.showGroup = function (user) {
    if (user.group && vm.groups.length) {
        var selected = $filter('filter')(vm.groups, { id: user.group });
        return selected.length ? selected\[0\].text : 'Not set';
    } else {
        return user.groupName || 'Not set';
    }
};

vm.showStatus = function (user) {
    var selected = \[\];
    if (user.status) {
        selected = $filter('filter')(vm.statuses, { value: user.status });
    }
    return selected.length ? selected\[0\].text : 'Not set';
};

vm.checkName = function (data, id) {
    if (id === 2 && data !== 'awesome') {
        return 'Username 2 should be \`awesome\`';
    }
};
Delete row in the table
vm.removeUser = function (index) {
vm.users.splice(index, 1); };
Add the new row
vm.addUser = function () { vm.inserted = { id: vm.users.length + 1, name: '', status: null, group: null, isNew: true }; vm.users.push(vm.inserted); };
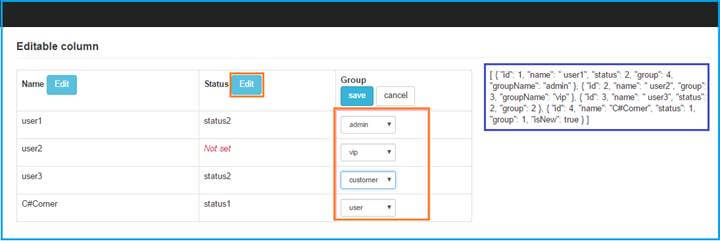
Run the Application. If you click Add row button, it will add one new row in this table. Suppose, we can edit or delete in same way. Save button enables, when you are going to edit a row. Output 2 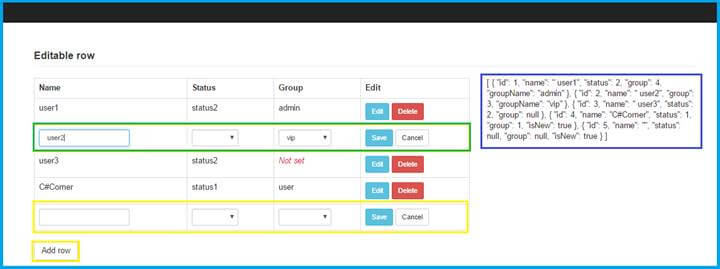 Editable Column We can edit the instance of table column on time. HTML code
| Name | Status | Group |
Once you click Edit button given above the table column header, it will enable to edit mode. Angular Controller code vm.saveColumn = function (column) { var results = []; angular.forEach(vm.users, function (user) { alert('Saving column: ' + column); }); return $q.all(results); };
Output 3
The whole table into Angular Controller code vm.filterUser = function (user) { return user.isDeleted !== true; }; vm.deleteUser = function (id) { var filtered = $filter('filter')(vm.users, { id: id }); if (filtered.length) { filtered[0].isDeleted = true; } }; vm.cancel = function () { for (var i = vm.users.length; i--;) { var user = vm.users[i]; if (user.isDeleted) { delete user.isDeleted; } if (user.isNew) { vm.users.splice(i, 1); } } }; vm.saveTable = function () { var results = []; for (var i = vm.users.length; i--;) { var user = vm.users[i]; if (user.isDeleted) { vm.users.splice(i, 1); } if (user.isNew) { user.isNew = false; } alert('Saving Table...'); } return $q.all(results); }; Run the Application Output 4 Before editable table |
 Editable Table
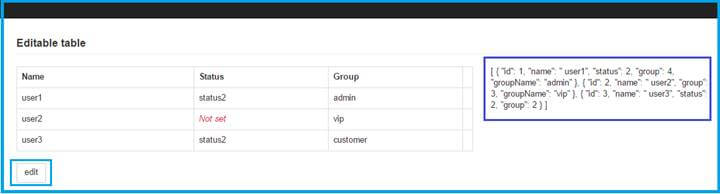 After editable table
 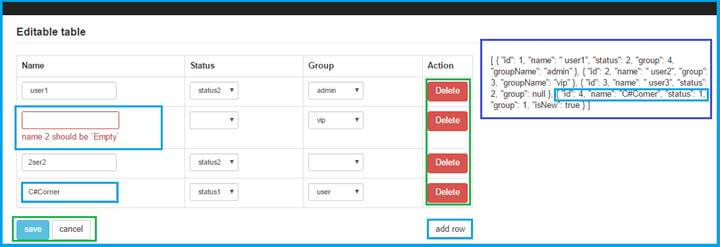 Note New row data will be added in JSON format. Afterwards, click Save button. If we need, we can valid the right data. Don’t forget to add the “editable” keyword, using Angular xeditable. For source download, click
 Comments
Be the first to comment.