AI links open with a title + excerpt (these tools can't fetch the page themselves) — use "Copy full article" to paste the complete text for a fuller summary.
Introduction
In this article, we will learn to work with MVC using Angular Maps with two types of maps, which are given below.
- Google Maps
- Vector Map
Follow the steps given below to use the Angular map in MVC:
- Create an MVC Project.
- Configure the Google/Vector Map.
- Work with Maps.
Create an MVC Project
Open Visual Studio 2015.  Go to New menu, click New >> Project. Now, it will open New Project window.
 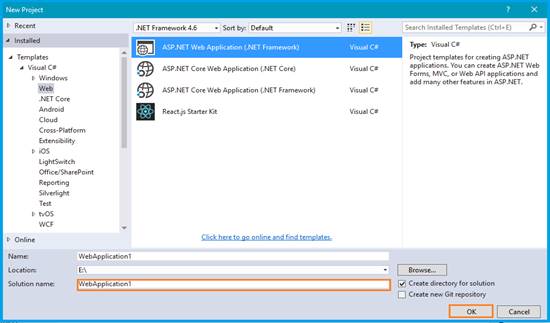 Select ASP.NET Web Application on Framework 4.6. Enter the name of the project in the “Solution name” text box and click OK.
 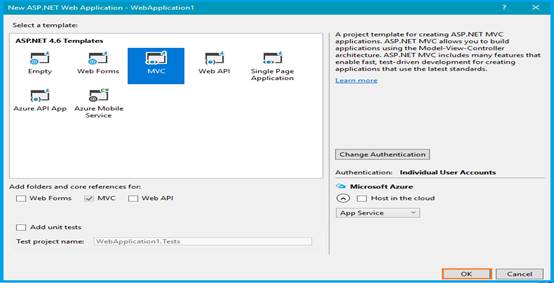 One more window should appear. Select the MVC Template in this pop-up and click OK.
Configure Google Maps
We will download the Google UI-Map from the following links:
Open the _Layout.cshtml file and refer to the ui-map.min.js file in this View page.
Open the HTML page, then design it using the map attribute.
HTML Code
Marker
Lat: , Lng: Set PositionMarkers
We have pointed the Map marker directive at an existing google.maps.Marker object, so that it can hook up the following events:
- ui-map-marker
- ui-event
JavaScript Code
Angular Module
Add the ui-map dependency to the Angular module.
var uiroute = angular .module('uiroute', ['ui.router', "ui.map"]);
Angular Controller
Set the values for the attribute. Open the “angular controller” files and hard code an input or you may get and bind the values.
function MapController($timeout) { $scope.myMarkers = []; $scope.mapOptions = { center: new google.maps.LatLng(35.784, -78.670), zoom: 15, mapTypeId: google.maps.MapTypeId.ROADMAP }; $scope.addMarker = function ($event, $params) { $scope.myMarkers.push(new google.maps.Marker({ map: $scope.myMap, position: $params[0].latLng })); }; $scope.openMarkerInfo = function (marker) { $scope.currentMarker = marker; $scope.currentMarkerLat = marker.getPosition().lat(); $scope.currentMarkerLng = marker.getPosition().lng(); $scope.myInfoWindow.open($scope.myMap, marker); }; $scope.setMarkerPosition = function (marker, lat, lng) { marker.setPosition(new google.maps.LatLng(lat, lng)); }; $scope.refreshMap = function () { $timeout(function () { google.maps.event.trigger($scope.myMap, 'resize'); }, 100); }; }
Here, the Google Maps MapOptions object can be passed through the main directive attribute ui-map.
$scope.mapOptions = { center: new google.maps.LatLng(35.784, -78.670), zoom: 15, mapTypeId: google.maps.MapTypeId.ROADMAP };
A ui-event allows you to specify the custom behavior of a user event. You just need to prefix the official event with map- to bind a callback to it.
After completing the entire configuration, add the reference file in the _Layout.cshtml page.
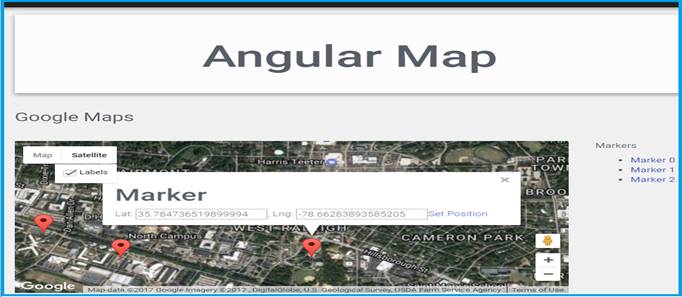
Now, when we run the application, we will see Google Maps with a marker.
Output 1
Configure the Vector Map
You can get this plug-in from here.
You will find various maps in here. Open the _Layout.cshtml file and refer to the jQuery link in my application.
This script makes our jQuery link into a directive so we can easily access it in HTML.
Angular Directive
return { restrict: 'EA', scope: { mapOptions: '=' },compile: compile}; function compile(tElement, tAttrs, transclude) { return { post: function(scope, element) { var options = scope.mapOptions, mapHeight = options.height || '250'; element.css('height', mapHeight); element.vectorMap(options) } }; }
Now, set the options for this vector map.
Angular Controller
$scope.mapOptions = { height: 400,map: 'world_mill_en', backgroundColor: 'transparent', zoomMin: 0, zoomMax: 8, zoomOnScroll: false, regionStyle: { initial: { 'fill': 'red', 'fill-opacity': 1, 'stroke': 'none', 'stroke-width': 1.5, 'stroke-opacity': 1 }, hover: { 'fill-opacity': 0.8 }, selected: { fill: 'blue' }, selectedHover: { } }, focusOn:{ x:0.4, y:0.6, scale: 1}, markerStyle: { initial: { fill: 'yellow', stroke: 'yellow' } }, onRegionLabelShow: function(e, el, code) { if ( vm.seriesData && vm.seriesData[code] ) el.html(el.html() + ': ' + vm.seriesData[code] + ' visitors'); }, markers: vm.markersData, series: { regions: [{ values: vm.seriesData, scale: [ 'gray' ], normalizeFunction: 'polynomial' }] }, }; $scope.mapOptions = { height: 400,map: 'world_mill_en', backgroundColor: 'transparent', zoomMin: 0, zoomMax: 8, zoomOnScroll: false, regionStyle: { initial: { 'fill': 'red', 'fill-opacity': 1, 'stroke': 'none', 'stroke-width': 1.5, 'stroke-opacity': 1 }, hover: { 'fill-opacity': 0.8 }, selected: { fill: 'blue' }, selectedHover: { } }, focusOn:{ x:0.4, y:0.6, scale: 1}, markerStyle: { initial: { fill: 'yellow', stroke: 'yellow' } }, onRegionLabelShow: function(e, el, code) { if ( vm.seriesData && vm.seriesData[code] ) el.html(el.html() + ': ' + vm.seriesData[code] + ' visitors'); }, markers: vm.markersData, series: { regions: [{ values: vm.seriesData, scale: [ 'gray' ], normalizeFunction: 'polynomial' }] }, };
Use the following code to create series data loading in our world map:
$scope.seriesData = { 'AU': 15710, 'RU': 17312, 'CN': 123370 };
Use the following code to create markers on the map:
$scope.markersData = [ {latLng:[41.90, 12.45], name:'Vatican City' }, {latLng:[43.73, 7.41], name:'Monaco' }, {latLng:[-0.52, 166.93], name:'Nauru' } ];
HTML
The vector map will be exposed by using this directive's vector-map.
<vector-map map-options="mapOptions"></vector-map>
Call the directive as an element in HTML.
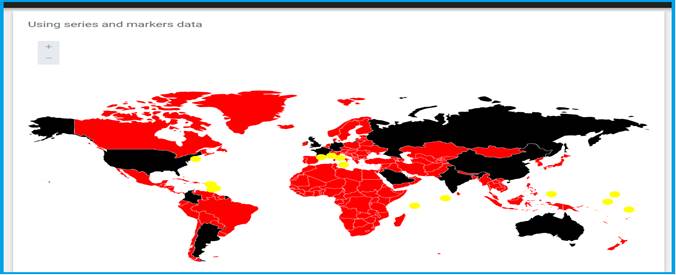
Using series and markers data
Now, we are ready to look at the vector world map with our markers added in. So, run the application.
Output 2
Conclusion
In this article, we have learned to use MVC by using Angular Maps. If you have any queries, please tell me through the comments section**.** Happy Coding!
Comments
Be the first to comment.